Vaadin: Drag and Drop Feature
In Vaadin 14.1 generic drag and drop feature was introduced. This blog post is a review of this feature based on the example of developing a simple football coach app.

Introduction
A couple of months ago, while developing an administrative console for one startup project, I was asked to implement drag and drop functionality. Specifically for that app, it was needed to drag a recipe card from the list and drop it into menu slot for a specific day and meal.
That app (which is still work in progress) uses Vaadin 13. So to implement drag and drop feature I used some help with HTML5 Drag and Drop Extension: a 3rd party addon from Vaadin Directory of addons and components.
Since Vaadin 14.1 the drag-n-drop feature is present "out of the box". And I'm curious to try to implement it on a simple app and compare the development process of using it without addon.
So, I'm gonna try to write the app where the user can chose the starting line-up of the football team (yep, I'm a big soccer fan). More specifically - to drag the player card from the list to imaginary football pitch.
Let's get started!
Preparing Basic Vaadin Project
As always, the most convenient way to start Vaadin project is to use Vaadin Starter.
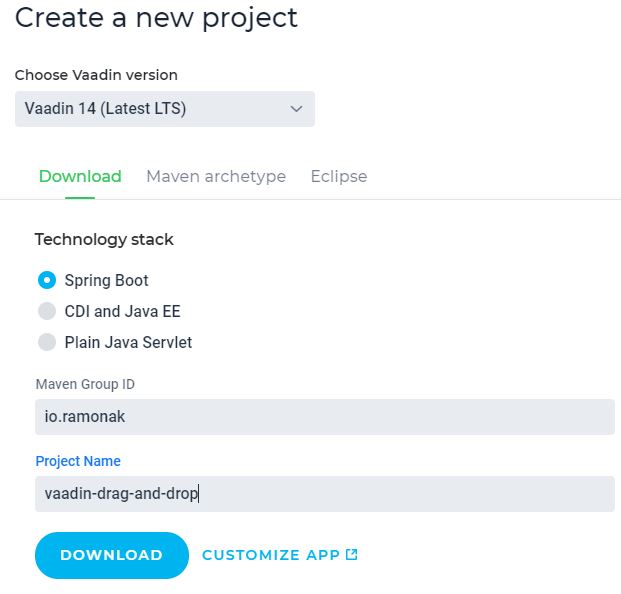
Download, unzip and open the project in IDE (I use Intellij Idea).
It's a basic Vaadin project, but it's fully working app (and it's PWA by default).
To decrease the volume of boilerplate code, there is a very useful library - Project Lombok. To use it we need to add the following dependency to pom.xml file:
  <dependency>
            <groupId>org.projectlombok</groupId>
            <artifactId>lombok</artifactId>
  </dependency>
Adding Backend Classes
First of all, let's create the Player class:
    @Data
    @AllArgsConstructor
    public class Player {

        private String name;
        private Integer number;
        private Position position;
    }
Lombok's annotations @Data and @AllArgsConstructor will take care of all the getters/setters and the constructor. Position is enum class with possible values of player's position:
public enum Position {
    GK,
    DF,
    MF,
    FW
}
The main focus of this blog post is to test drag and drop feature. So for simplicity I'll use the "hardcoded" data.
For example, let's use Juventus FC squad for season 2004-2005. Juventus won the Serie A title, but later was stripped of the title and sent to Series B. Nevertheless, the squad was legendary: Del Piero, Buffon, Ibrahimovic, Nedved...
Oops, sorry, I was carried away :smirk:.
So, let's create a data class:
@Data
public class JuventusData {

    private List<Player> players = new ArrayList<>();

    public JuventusData() {
        players.add(new Player("Buffon", 1, Position.GK));
        players.add(new Player("Ferrara", 2, Position.DF));
        players.add(new Player("Tacchinardi", 3, Position.MF));
...//and so on
    }
}
The full version of the class will be available in the GitHub repository.
Developing UI Components
It's time to create some UI. For that, I'll create some custom components. The first one is a Player Card component:
@CssImport("./styles/player-card.css")
public class PlayerCard extends HorizontalLayout {

    public PlayerCard(Player player) {
        addClassName("player-card");
        Div name = new Div();
        name.setText(player.getName());
        Div number = new Div();
        number.setText(player.getNumber().toString());
        Div position = new Div();
        position.setText(player.getPosition().toString());
        add(number, position, name);
    }
}
This class extends HorizontalLayout, which means that all children's components will be added horizontally, one by one. PlayerCard component consists of 3 Divs: name, number and position. Constructor takes Player as a parameter and initializes Divs with text values of the player's name, number and position.
According to Vaadin docs, Style Sheet file we should place into frontend/styles folder and then use @CssImport annotation with the path to css file to add some styling to the component. There is a basic styling in player-card.css:
.player-card{
    width: 200px;
    padding: 5px;
    border: 1px solid black;
}
It would be good to see in the browser what we've developed so far. For that we need to make some changes in MainView class' constructor: delete default MessageBean and add created Player Cards:
public MainView() {
        JuventusData data = new JuventusData();
        data.getPlayers().forEach(player -> {
            add(new PlayerCard(player));
        });
    }
It's my "tradition" - not to use port 8080:sunglasses:. So I changed in application.properties file server.port to 9999.
Run the app in IDE or using command:
mvn spring-boot:run
Go to localhost:9999 (or 8080, or whatever port you use) in a browser.
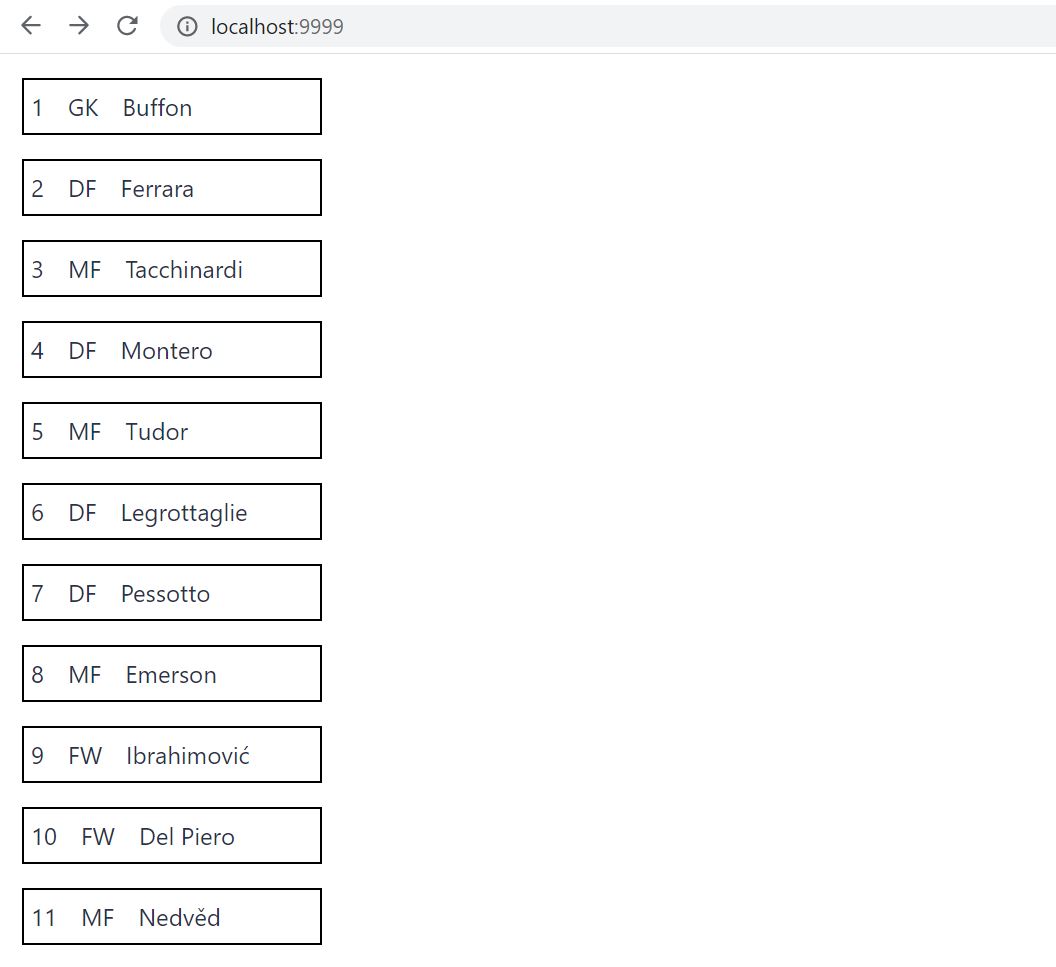
Well, looks OK.
Now let's try to add the "football field" with classic 4-4-2 tactics. For this, we'll use parent Div element with children Divs and some styling.
@CssImport("./styles/football-field.css")
public class FootballField extends Div {

    public FootballField() {
        addClassName("football-field");
        add(createRow(2), createRow(4),
                createRow(4), createRow(1));
    }

    private Div createRow(int numOfPlayers) {
        Div row = new Div();
        for (int i=0; i<numOfPlayers; i++) {
            row.add(new FieldPosition());
        }
        row.addClassName("row");
        return row;
    }
}
where FieldPosition component is:
@CssImport("./styles/field-position.css")
public class FieldPosition extends Div {

    public FieldPosition() {
        addClassName("field-position");
    }
}
And respective css files:
- football-field.css
.football-field{
    width: 380px;
    height: 600px;
    border: 2px solid black;
    background: url("img/soccer-field.png") no-repeat center;
    background-size: contain;
    display: flex;
    flex-direction: column;
    align-content: space-around;
    justify-content: center;
}
.row{
    padding-top: 100px;
    width: 100%;
    height: 20%;
    display: flex;
    flex-direction: row;
    justify-content: space-evenly;
}
- field-position.css
.field-position{
    width: 30px;
    height: 30px;
    border-radius: 50%;
    text-align: center;
    vertical-align: center;
    background-color: white;
}
By default, the MainView class extends Vertical Layout, which means that all the components will be added vertically. But we need to place the "football field" to the right from players list. To do so some changes are needed in MainView class:
- replace extends VerticalLayout on extends HorizontalLayout
- move all PlayerCards into new Vertical Layout
- add FootballField component
@CssImport("./styles/main-view.css")
public class MainView extends HorizontalLayout {

    public MainView() {
        VerticalLayout playersList = new VerticalLayout();
        playersList.setSizeUndefined();
        playersList.addClassName("players-list");

        FootballField footballField = new FootballField();

        JuventusData data = new JuventusData();
        data.getPlayers().forEach(player -> {
            playersList.add(new PlayerCard(player));
        });
        add(playersList, footballField);
    }
}
Standard Vaadin's Vertical Layout component (where we added Player Cards) has a width of 100%. To change this behavior we should use setSizeUndefined() method on playersList component and add minimal styling:
.players-list{
    width: 40%;
}
Restart the app and check the view in browser:
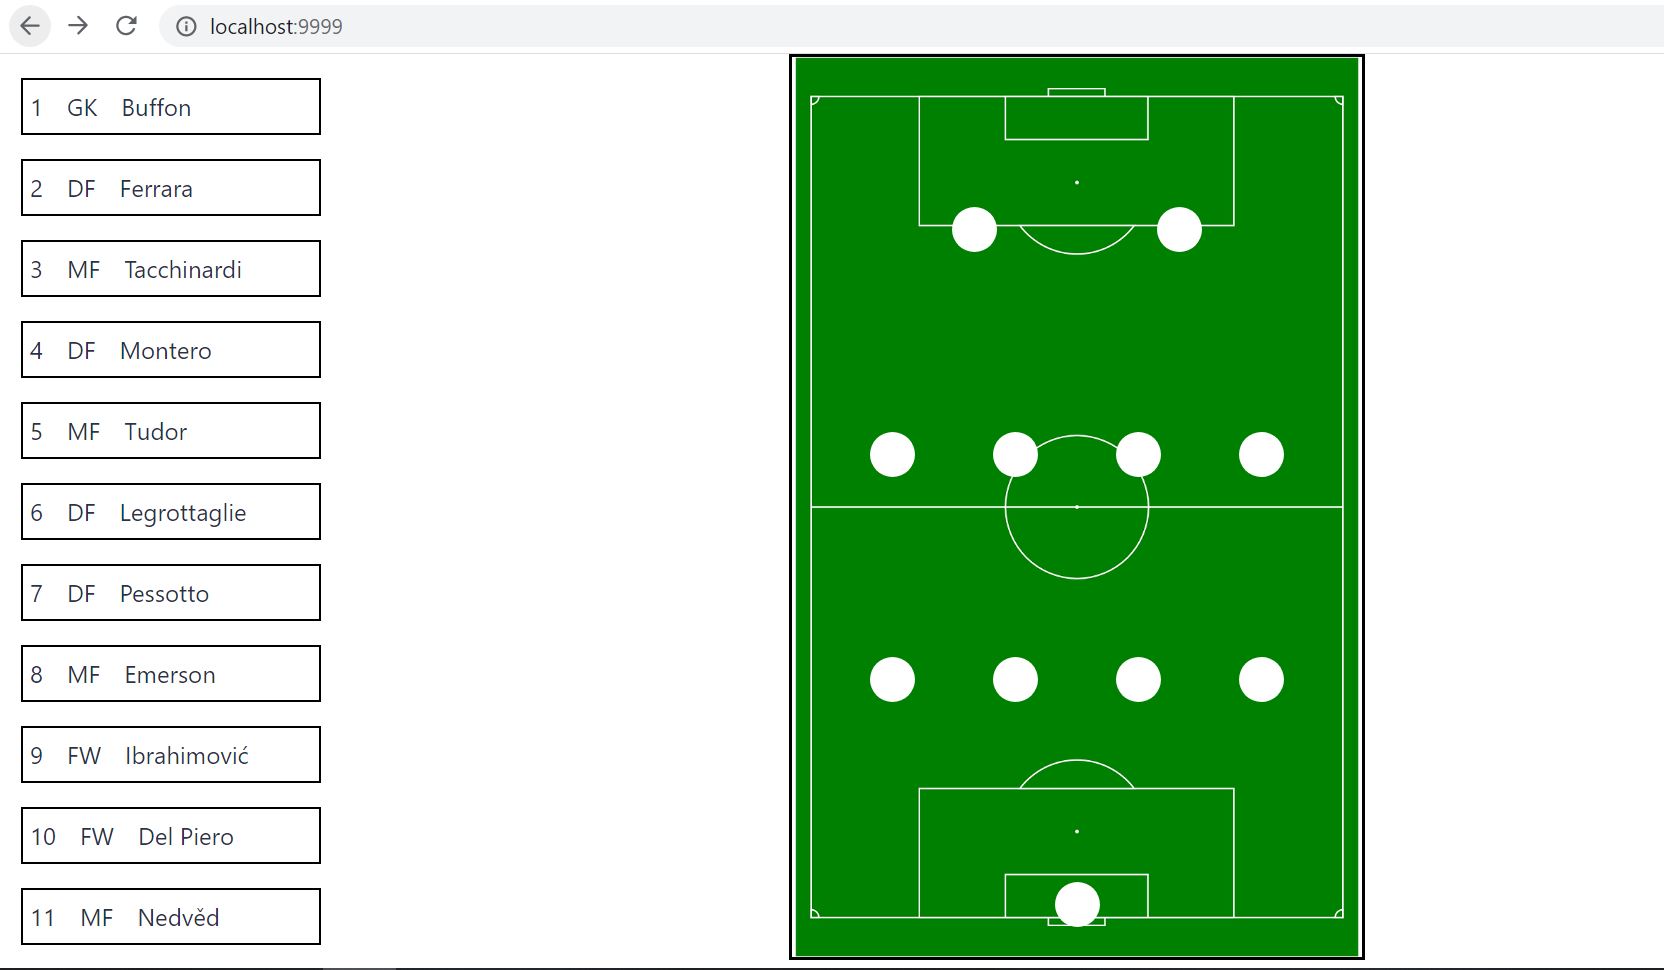 Image of a soccer field by OpenClipart-Vectors from Pixabay
Adding Drag and Drop Functionality
Well, now we got to the point, where we can add drag and drop feature.
Vaadin's implementation of Drag and Drop feature is based on HTML5 drag and drop API.
According to Vaadin docs, to make any custom component draggable, the component's class should implement DragSource interface (1) and you should add setDraggable(true) in constructor (2). So, our PlayerCard component should look like this:
@CssImport("./styles/player-card.css")
public class PlayerCard extends HorizontalLayout implements DragSource<PlayerCard> { //(1)

    public PlayerCard(Player player) {
        addClassName("player-card");
        Div name = new Div();
        name.setText(player.getName());
        Div number = new Div();
        number.setText(player.getNumber().toString());
        Div position = new Div();
        position.setText(player.getPosition().toString());
        add(number, position, name);
        setDraggable(true); //(2)
    }
}
Now, if we restart the app, open the dev tools in the browser to inspect the player card element, we'll see that the draggable attribute is assigned to every player card.

Assume, we want just the player's number to be shown on the football field schema. How can we achieve this? We can assign server side data, which we'll be provided to the valid Drop Target on the DropEvent. So, for that, we should add the following code to PlayerCard constructor:
setDragData(number.getText());
Now let's make the "football field", or rather field positions, to be drop targets.
To do so we should do the following:
- make the FieldPosition class to implement DropTarget interface (1)
- allow drops (2)
- add Drop Listener, which will be listening to the Drop Event (happens when the user performs a valid drop), and retrieve the assigned data from the dragged component (3)
@CssImport("./styles/field-position.css")
public class FieldPosition extends Div implements DropTarget<Div> { //(1)

    public FieldPosition() {
        addClassName("field-position");
        setActive(true); // (2)
        addDropListener(event -> { // (3)
            event.getDragSourceComponent().ifPresent(this::add);
            event.getDragData().ifPresent(data -> setText(data.toString()));
        });
    }
}
Time to test what we've developed so far. Restart the app and navigate to localhost:9999 in browser:
Everything works as intended!
Let's see what else can we do with the app to test additional Vaadin's drag-n-drop functionality.
Styling!
We can change the style of the draggable component while dragging it. Vaadin automatically adds v-dragged class name to the root element of the component. To test it, we need to add some styling in player-card.css. For example, let's change the background color of the player card while dragging it:
.v-dragged.player-card{
    background-color: aqua;
}
And when we'll try to drag the player card, the background color changes and v-dragged class name is being added to the element.
Also, we can change the styling of the drop target components - Field Positions. Let's highlight possible drop targets when the drag event starts. To do so we have come work to be done:
- add styles to field-position.css to highlight drop targets. For that I'm gonna use yellow border:
.drop-target {
    border: 2px solid yellow;
}
- then we need to add this class to every free Field Position when drag event starts and then remove this class after drop event. For that, we have to keep track of all Field Positions on Football Field and also flag if Field Position is empty or not. Let's add Collection of positions as a field to FootballField class with @Getter Lombok annotation (1) and gather all positions when creating rows (2):
@Getter // (1)
@CssImport("./styles/football-field.css")
public class FootballField extends Div {

    private final List<FieldPosition> positions = new ArrayList<>(); //(1)

    public FootballField() {
        addClassName("football-field");
        add(createRow(2), createRow(4),
                createRow(4), createRow(1));
    }

    private Div createRow(int numOfPlayers) {
        Div row = new Div();
        for (int i=0; i<numOfPlayers; i++) {
            FieldPosition fieldPosition = new FieldPosition(this);
            row.add(fieldPosition);
            positions.add(fieldPosition); //(2)
        }
        row.addClassName("row");
        return row;
    }
}
and then add boolean field isEmpty initialized to true by default to FieldPosition class (getter and setter we'll be handled by @Data Lombok annotation):
@Data
@CssImport("./styles/field-position.css")
public class FieldPosition extends Div implements DropTarget<Div> {

    private boolean isEmpty = true;

...
- add Drag Start Listener to every Player Card in MainView.class, which will be listening to drag start event and change styling of empty field positions when event fired:
//MainView.class
...
data.getPlayers().forEach(player -> {
    PlayerCard playerCard = new PlayerCard(player);
    playerCard.addDragStartListener(event ->
        footballField.getPositions().forEach(position -> {
            if (position.isEmpty()) {
                position.addClassName("drop-target");
            }
        }));
    playersList.add(playerCard);
});
...
- and then we should remove
drop-targetclass from all Field Positions after Drop Event. To achieve this we could use DragEndEvent combined with isSuccessfull() method in PlayerCard class, but it'll work only in Chrome and Firefox browsers, as Edge, Safari and IE11 do not report whether the drop occurred successfully or not in the Drag End Event. That's why Vaadin's team recommends to put logic for successfull drop into Drop Target, which in our case is a Field Position:
//FieldPosition.class

...
addDropListener(event -> {
    event.getDragSourceComponent().ifPresent(component -> {
        add(component);
        setEmpty(false);
        field.getPositions().forEach(position ->
            position.removeClassName("drop-target"));
    });
    event.getDragData().ifPresent(data -> setText(data.toString()));
});
...
Let's see how it all works in a browser:
Works fine!
One more thing I'd like to add is to change styles of Drop Target element when the Player Card is over the Field Position. Vaadin adds v-drag-over-target class name automatically while the dragged object stays on top of the drop target. Assume, I want to change the background color of the Field Position circle to "deep pink" when the Player Card is over it. Then in field-position.css file add:
.v-drag-over-target.field-position{
    background-color: deeppink;
}
And also we need to set DropEffect to Drop Target and matching EffectAllowed to Drag Source. Honestly, there is a bit confusing description in Vaadin doc's when and why we should use Effect Allowed and Drop Effect:confused:. Experimental way I determined that v-drag-over-target class name only added when matching Effect Allowed and Drop Effect are set on PlayerCard and FieldPosition respectively. That is:
//PlayerCard.class constructor
...
setEffectAllowed(EffectAllowed.MOVE);
...
//FieldPosition.class constructor
...
setDropEffect(DropEffect.MOVE);
...
Now if we restart the app and navigate in browser to localhost:9999:
All the additional styling works as expected!
Conclusion
Well, Vaadin's drag and drop feature definitely works! And it's implementation "out of the box" is the way more convenient to use than using 3rd party addon. Automatically added class names for styling is also easy to use.
And as you see, it is possible to develop with Vaadin not only strict business apps, but a funny football app too:wink:.
The source code of the complete project is available in this GitHub repository.